
Sunday, February 13, 2011
MagpieRSS with RSS2.0 and Atom1.0
 |
MagpieRSS.zipRSS 2.0 / Atom 1.0 / Wordpress Fix / Category Fix02/13/11 |
This post is for the Googlers.
As I was making my Friends 3.0 page, where I have my friends' blog entries as if they were posted on my site, I came across some limitations of Magpie RSS. The software is very good at making a big array out of an RSS feed, but it can't handle some of the newer web standards like RSS 2.0 and Atom 1.0. When I started to add a lot of personal feeds to the friends page, magpierss's limitations became more apparent.
As much as I searched, I couldn't find a real solution other than completely rewriting my friends page based on other RSS parser like Simple RSS. Luckily, I came across a hack of Magpie on Google, and I wish I could remember where it came from so I could give credit. The page wasn't even available anymore, but Google had cached it, and I managed to copy it. I had to do a lot of editing to remove the HTML formatting, but it does what it promises, and gives magpieRSS the RSS 2.0 and Atom 1.0 support it so desparately needs these days.
That's not the only thing special about this hacked together MagpieRSS file though. It seems Wordpress sites have broken most Magpie RSS feeds with it's "media:content" tag. For some reason, when MagpieRSS parses this tag, its "content:encoded" tag changes simply to a big letter "A". It through me for a loop for a while, and not seeing a good fix online, I simply edited the Magpie parser to ignore "media:content". This fixes the content:encoded issue, which I think is more important than some media file anyways.
The last edit of the MagpieRSS deals with categories. Many feeds list assigned categories with by having each one in a
<category>Sports</category>
<category>Baseball</category>
MagpieRSS will simply append the category array value each time so you end up with "SportsBaseball". My version appends a '@@@@' at the end of each category, so the array value will be "Sports@@@@Baseball@@@@". From there you can use the php function 'explode' to separate each category from the string.
Hopefully, someone out there will find this useful.


Tuesday, November 30, 2010
FreeNAS Update: Rsync and Unison
I've been using FreeNAS since the beginning of April, 2010, and it certainly has met or exceeded my expectations in that time. It still serves its purpose well, however the way I have it set up has changed quite a bit since April. You can find my original post here (FreeNAS Review). I wanted to take the time to describe my first thoughts when creating my NAS file server, and how it has changed into its current form.My NAS's main purpose is to be a file server and store movies, tv shows, and music to be used mostly by my AppleTV, but also with all computers on my network. I had started in June/July '09 with an external hard disk plugged into my Apple Airport Extreme router. The disk spun 24/7 and eventually became unreadable by September and I was mad. Luckily for me, I still had most of my data backed up on the gaming desktop. But the backup was taking most of my desktop's HDD space and so I wanted it all on its own. For that reason, I bought a Linksys NAS 200 that featured RAID1. I thought a second disk would at least keep my data safe if the disk crashed again. It was waaay too slow for my needs and so I built the FreeNAS server.
RAID1 vs. Rsync
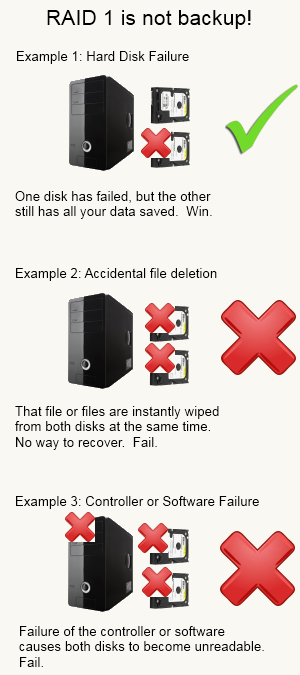
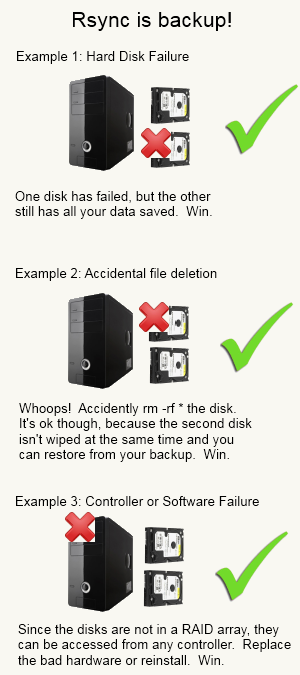
FreeNAS was set up with the same RAID1 as the Linksys and it was much faster, so life was good. But as I talked about it more and more, RAID1 sounded less and less secure. Sure, I was safe from a hard disk failing but there were other things that could delete my collection still, and I'd be SOL. I could accidently type a command wrong and accidently delete the entire /Movies folder with a hit of the enter key, and that would happen on both drives instantly. Or the flash drive containing my FreeNAS config could fail and my software controller would be erased. Without the software controller settings, you can't access a RAID array (at least not easily, like at the user level). So for these reasons I backed up, wiped the RAID array away, and changed to a local rsync service.
|
|
Unison
In addition to backing up my media, the FreeNAS server acts as a remote location for backing up important files from my other computers, including my macbook pro(music), Gaming PC(Pictures), and Alison's files. The Macs simply use Time Machine to backup their files, and I could use Windows 7 Backup to store my desktop's files. But, I thought it'd be nice to sync my Pictures between the desktop and the laptops. That way, when I go home or do imagework, I always have the latest, up-to-date images on all the machines. Having them on different computers protects them against being lost if a disk dies, and unison can archive deleted files if you want it to which protects against accidental deletion. You can think of unison as two-way Rsync, in that any change you make will be backed up on the server, but if the server data changes, the changes will be sent to your computer as well.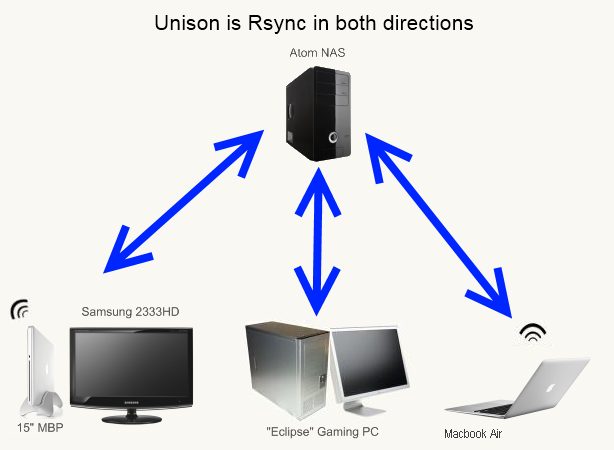
Next, create a preferences file on each computer you want to sync files to. Probably looking something like this:
batchpref.prf
    # Roots of the synchronization
    root = /Users/username/Whatever/
    root = ssh://username@192.168.X.XXX//mnt/Disk/PathTo/Wherever/

    # Paths to synchronize
    #path = current
    #path = common
    #path = .netscape/bookmarks.html

    ignore = Name {._*,.DS_Store,Thumbs.db}
Obviously, you'll want to change the username, IP address, and path to your own settings. You need to give it two directories to make the same. One local to the computer, and one on the remote disk or network location. "ignore" tells the config to ignore whatever files or regex you want. In my case, it's ignoring those annoying hidden windows and OSX files. You can set it to anything, even entire directories. And there are lots of other options you can do as well. See the User manual for all options (User Manual).
Once the config file is done, save it to the appropriate place.
In OS X, it's ~/Library/Application Support/Unison/batchpref.prf
In Windows (Cygwin), it'll be c:\cygwin\home\username\.unison\batchpref.prf
Linux is probably ~/.unison/batchpref.prf (I dont have straight up linux, so I don't know for sure)
Now that the preferences are saved, you should be able to run unison from the command line. Type:
This tells the computer to run unison, in the text-only user interface, in automatic mode (doesnt ask you what to do in errors), and to use the preference file we just made. From here, you can run it as a cron job in OSX/Linux, or make a .bat file in windows and run it with Task Scheduler. I have it run on windows at startup, and once a day on the macs. You can also run it manually when you want to make sure you're up to date.
Now, I guess websites like dropbox offer similar capability, but you're either limited in filesize or you have to pay for it. Paying isn't a bad idea, since I suppose if my house burned down I'd still lose everything. But I find unison to be a great way to back up and syncronize easily and for free. Especially if your data is the "nice to have" but not the most important memories of your life.
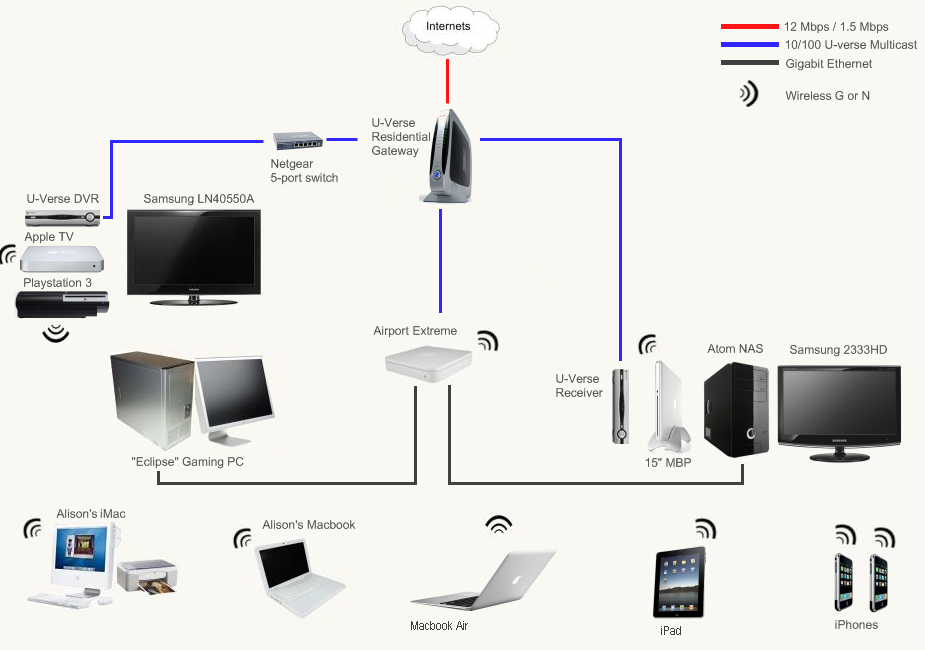
I'll finish the post off with a newer pic of my home network. It's clickable to view it a little bigger. I still have other FreeNAS updates I can write about, but since Rsync and Unison are so closely related, I thought I'd give them their own post.


Thursday, April 29, 2010
FreeNAS Review
I promised in my last tech post that this entry would continue, and hopefully conclude, my journey towards the perfect Network Attached Storage (NAS) system. The primary reason I want to use one is to stream TV Shows and Movies to my Samsung 40” LCD TV in my Living Room by means of my AppleTV. It also serves as a backup location for my important files, and is now capable of performing server related tasks that were previously handled by the AppleTV. This is my 4th attempt at a NAS solution for the Spitfire Network, the most expensive, the most capable, and finally…the most likely to survive. For a quick NAS summary:
| Eclipse (Gaming PC) | Too loud, power intensive, resource hog no redundancy | |
| Apple Extreme Wireless Station + USB HDD | Ran drive continuously leading to failure no redundancy | |
| Linksys NAS 200 | Ridiculously Poor Performance, Noisy | |
| Atom / FreeNAS | Best of all worlds but expensive, large footprint |
I tried all the cheap alternatives to buckling down and forking over the cash for a decent NAS / Server but in the end the only lesson is one we should all be familiar with already - You get what you pay for. In trying to be cheap, all I got in return was lost data (Apple Base Station) and unusable performance (Linksys + hosting files on my gaming pc). Not that a FreeNAS solution has to be expensive however. These days many people have a spare PC in their garage or something. All it needs to be given new life as a FreeNAS server is:
x86 Processor
128 MB ram
32 MB disk space
Network card
The catch is that your hardware has to be supported by FreeBSD, but I’d be willing to bet that if it’s anything similar to a commercial computer, you are all set. I looked into the option of buying a cheap, used PC for under $100 on craigslist but in the end I decided to build a new PC specifically for a few reasons:
1. I knew exactly what hardware it would have, with warranties.
2. By using an Atom chipset it has power consumption comparable to a netbook, which is preferable to a power hungry P4
3. The Atom D510MO chipset is fanless, making the entire computer almost silent
4. Gigabit Ethernet (up from 10/100 on the linksys nas)
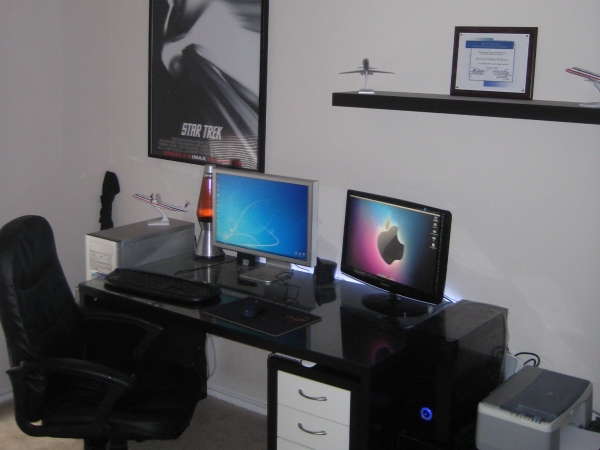 I bought a nice looking glossy black case from Newegg, which was running a pretty nice deal on it as long as I signed up for spam, and sold the Linksys NAS for $5 profit. I had the disk drives already from the linksys raid setup, so in the end I just had to buy the case, atom board/cpu combo, and 1 GB of RAM for it. Not too much cost to expand its use greatly, but if you were starting from scratch it might be a big investment. So give it a try with your old garage PC first. I paired the computer with a 23” Samsung 2333HD Display, which is kind of a misnomer. The actual NAS is capable of displaying a typical Unix/bsd console, but it’s really meant to run in a corner or a closet without a keyboard or monitor hooked up. In fact, there is no GUI display included. The monitor is really displaying video from my macbook pro, which makes the computer give the appearance of a hackintosh. It’s also a nice 1080p HDTV. The actual Atom computer runs without being plugged into the monitor, unless I’m debugging something.
So I spent all this money getting decent hardware, at least the software was free! You’ll need to decide between a “full install” or “embedded” install. The full install is like a typical OS installed onto your disk. The embedded install is copied to a USB Flash Drive which is then booted off of, and it runs FreeNAS in a virtual disk created out of RAM. The full install is easier to customize, but the embedded install is blistering fast and allows your hard drives to spin down when idle. I went with the embedded because it’s very important to me for the idle disks to spin down. This saves wear and tear, heat (remember it’s fanless), and power ($). You can’t repartition the boot drive, so I had to add another flash drive to run my custom server apps like rssdler and python. Running these apps off the main data HDDs would prevent them from spinning down (they’d never be idle). Flash drives are cheap SSDs and it works great for NAS purposes.
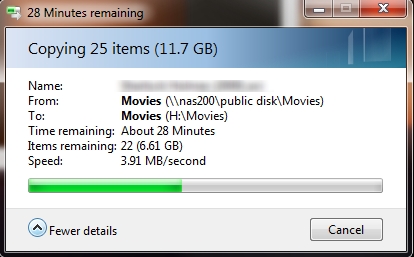
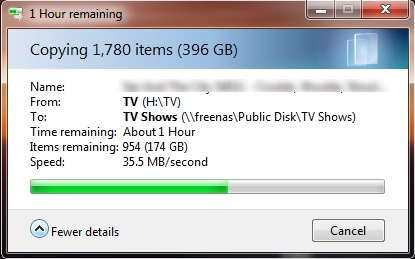
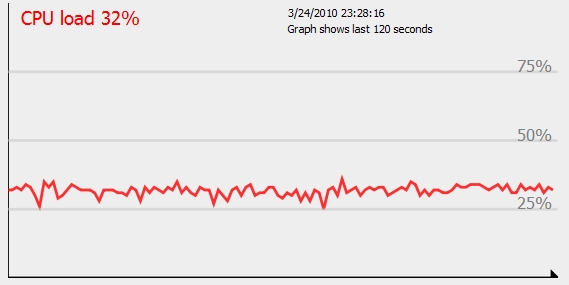
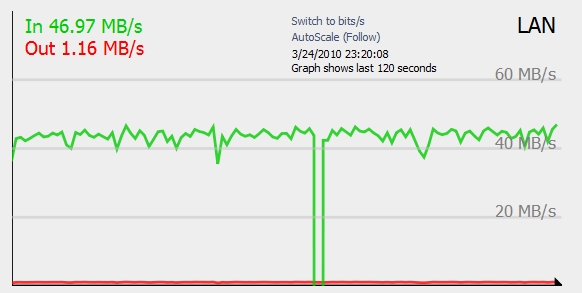
After the initial console setup, you can unplug the monitor and control the system via a web interface on any other computer on the network. This makes it very easy to choose services, set them up, add disks and shares… You really don’t have to be a pro to get it to work reliable and consistently. I followed a tutorial, added my two hard drives as a redundant software RAID 1 array[Edit 11/30/10: This has changed, see: FreeNAS Update: Rsync and Unison], and added windows and apple file sharing in less than 20 minutes. Performance was a ten-fold increase over my Linksys NAS, averaging about 40MB/s transfers which I’m guessing is limited by gigabit ethernet. But don’t take my word for it, here’s some fancy looking pictures:
|
|
|
|
My Atom server blows away any of my previous NAS attempts, and I’m finally happy and able to not worry anymore about my hard disks crashing and taking all my stuff with them like the great hard drive crashes of 2003. It’s far quieter and faster than the Linksys NAS, and I can run apps like rssdler off the server alone. This means the AppleTV, which is already slow, doesn’t have to use its few resources on downloading for me anymore. It uses waay less power than my gaming pc did when it stayed on to serve files, and adds the redundancy of two drives, protecting against hardware failure. The loss of one hard drive wouldn’t make me lose any data. The web interface is easy to use, and since it’s a mini-atx form factor, it’s got plenty of room for additional hard drive space so I can expand it over time. The Linksys and many other NAS devices only support a maximum of two disks. And did I mention how quiet it is?
The only disadvantages I could think of was the additional cost for having an additional computer. If you have an old PC and could throw it in the closet or something, this disadvantage may not mean much for you. Also, the mini-atx form factor eats up some desk space for me, but I want to keep it close to my other computers. Again if you threw it in a closet you might not care. I’m decent enough with Linux/Unix/bsd commands that I didn’t have any trouble setting it up, but if you’re a windows lover then buying a commercial NAS might be up your alley.
So in summary, I am totally blown away by FreeNAS and all it’s capable of. I tried everything else, but sometimes when you need the job done right you just have to do it yourself. My next tech post will probably be about AT&T U-Verse, how it’s integrated into my new house, changed my network, and reacted to my experiments.

Check out the free software at: http://freenas.org/freenas


Tuesday, March 23, 2010
Linksys NAS 200 Review
 I’ve made several posts about my TV setup, and making improvements to the little home theater is a growing hobby of mine. Most of my recent posts have revolved around hacking the AppleTV, but it’s only part of the setup. If the AppleTV has nothing to play, then what’s the point? Until recently I never much cared for TV. I mostly just used my computer to watch TV (tuner card), play DVDs, collect anime, movies, shows, etc.. But when we got the LCD TV and I started streaming all my stuff through the PS3 to display it on the big screen, I knew I could make it really cool. There were a few problems with that setup though. My computer had to be on, which ate up power. I had to run the Tversity service which was hard to update and slowed down my computer. The PS3 made a lot of noise, and couldn’t play everything I had saved. The AppleTV solved the PS3’s problems, but in order to store all my content, I’ve been going between different setups. My first attempt was an external USB HDD plugged into the USB port on my Apple router. The router acts as a NAS server and shares the drive across the network. This worked great for a while and is certainly a cheap and easy solution, but the hard drive crashed twice taking all my data with it. Luckily most of it was still backed up on my computer. Not sure if the drive or the router was to fault, I decided to buy a second hard drive and the Linksys NAS 200 to fit my needs. Will it work out?
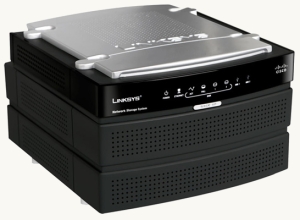
The first thing I like about the Linksys NAS 200 is its compact design. It looks pretty similar to a linksys router, but sitting on top of two hard drive bays. Installation of the two SATA drives was pretty simple, just push them all the way back. Pulling on a ribbon will pull the drives free again. You plug in the power, plug in the cat5 cable, and you’re done with the physical setup.
The software that powers the device is alright. It does the job as a NAS, but you get the feeling that something like this would be capable of so much more. The NAS 200 will spin down the hard drives when they are not being used, which saves power, wear and tear, and heat from building up in its idle time. I have a feeling this was what lead to failure when I used the USB enclosure. When data is requested from the NAS server, it spins up the drive and fans help keep them cool, prolonging each hard drive’s life. The number one reason I looked into a device like this was the dual hard drive bays supporting RAID 1 (Mirroring). The NAS 200 can be setup to make an exact copy of the first hard drive onto the second so if one dies, you won’t lose data. Alternatively, you can double up on hard drives for more space. Other than a long wait for it to duplicate the disk, it was easy to setup and a load off my mind.
The NAS 200 uses samba, or windows file sharing, which is pretty much standard among home networks. It was very simple to get the AppleTV and other computers to access data, and I was able to get Windows 7 Ultimate to backup to the drive pretty easily. It also features a web interface, giving you the possibility of accessing your files remotely (like from work). My upload speeds are way too horrific to give this a try. It can download files for you, letting you turn your computer off, but it’s HTTP instead of bittorrent which is not as useful.
 Things I do not like about the Linksys NAS 200 are numerous. My first complaint is one I read before I bought it, so I knew going in. It’s slow. Like, it’s floppy drive slow. The NIC on it is a 10/100 mbps speed, which..come on…we’ve had gigabit for almost a decade already… On a device meant to handle large amounts of data, the speed at which it’s done is atrocious. I have about 1 TB of content, and copying it all to the NAS 200 took over 3 days! It’s so slow that windows has to put up a progress bar when renaming files. Mirroring the hard drive took forever, and the web interface is slow. It’s rocking a 486 processor inside, which probably runs hotter and slower than more recent even cheaper processors. It’s irritatingly slow, and I’m surprised I held off for several paragraphs before blurting that out. My graphing calculator could probably serve files faster than this.
It’s also loud as shit. Computer noise is starting to annoy me more and more. With its fans running, I can hear it from anywhere in the apartment, and even over my gaming PC which sits right next to me. I’m glad those fans are there to save my hard drives from heat death, but not if it makes my ears bleed.
Those are really the only two bad things about it, but it’s enough to make me want to get rid of it. If you are planning to hide the device in an attic, or somewhere you wouldn’t be exposed to its noise then it could be a good buy. But you’d also have to have a jurassic-era 100base-t network and running pentium pro computers to not notice how freaking slow it is. The only thing it has going for it, is that it’s cheaper than most of its competition. It’s a cheap device and you get what you pay for.
Deciding to spend the little extra to get what I want, I’ve recently built a micro-ATX 1.66Ghz Atom server and successfully installed FreeNAS. I’m hoping to have the configuration done by Thursday, which will be detailed in the next tech post.


Tuesday, January 12, 2010
Proper Magic Mousing
Alison got me one of the new "Magic Mouse" mice from Apple for Christmas, although I just got it yesterday. They were readily available for about a week after they were announced, and then they were gone. It's taken forever to find one actually in stock. It's the first time I've actually been excited about a mouse from Apple. Always trying to reinvent it with each iteration, it's always seemed like a better idea just to buy a $10 usb mouse and sell the ones they come with for profit. So I was pretty skeptical when the Magic Mouse was released. Apple is all about the multi-touch tech these days and it surprisingly kicks a lot of ass. Like its predecessors, its "virtual buttons" make it not ideal for gaming but most of the time my Macbook Pro sits in the corner of my desk, and having a nice bluetooth mouse will make casual web browsing and OS use easier.
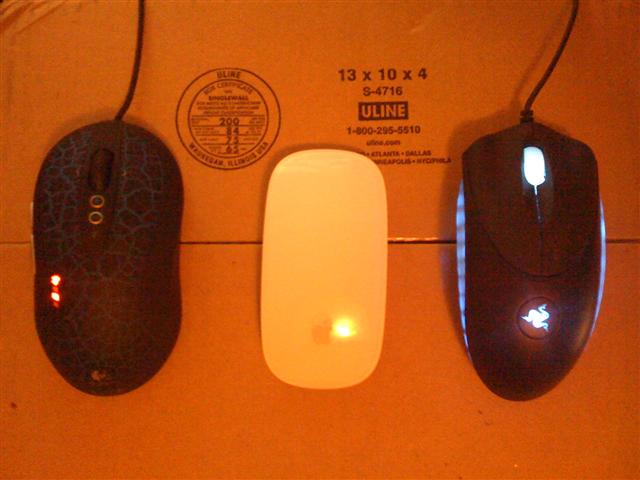
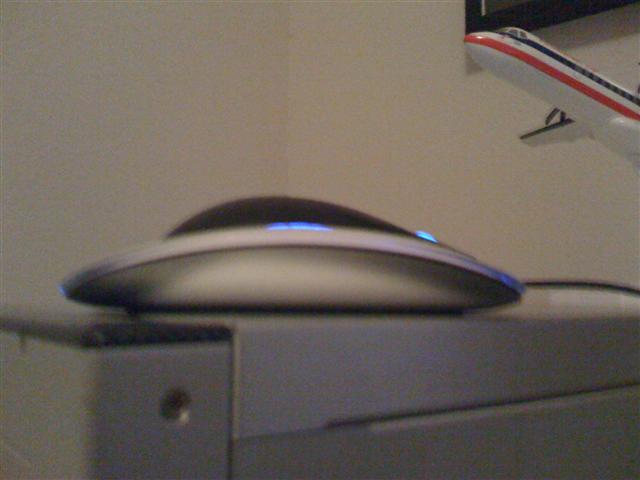
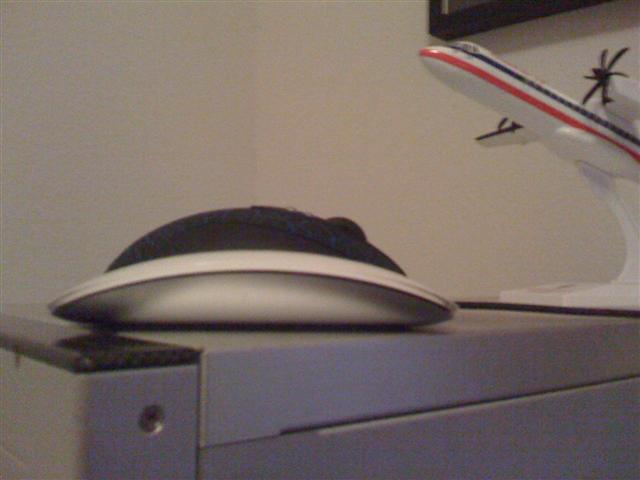
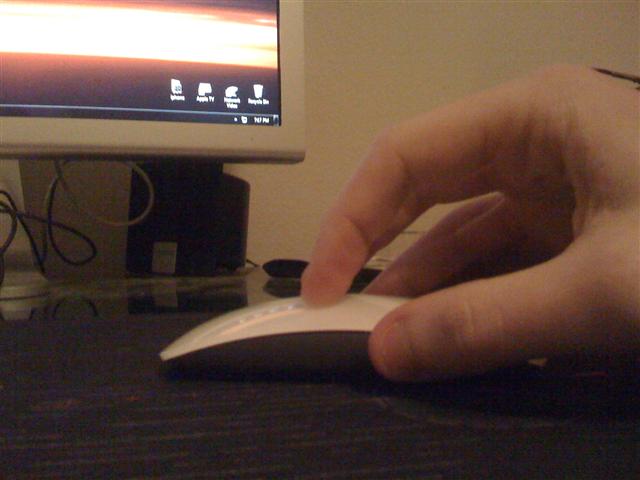
Like all Apple mice, it gets a lot of hate from people who haven't used it or are using it wrong, so I thought I'd take some pictures of its proper use. There are two types of mice it seems: the big "palm" mice like the microsoft intellimouse of a few years ago, and "finger" mice like my favorite Razer Copperhead. With palm mice, you rest your hand over the mouse and move your arm at the shoulder to move the mouse around. Finger mice are for those who keep their arm stationary and move the mouse with wrist movements. I'd definately put myself in the finger mouse camp. I hate big mice. So if you're like me, you'd probably like the Magic Mouse too.

